
Amazon integration enables you to:
- Create product listings
- Download your Amazon orders
- Pick, pack and despatch orders
- Send tracking information to Amazon
- Update and synchronize inventory
- Create Fulfilled By Amazon (FBA) listings and import records of FBA orders
Integrating StoreFeeder with your Amazon marketplace is a simple process. Just follow the instructions below and you should be up and running in no time.
Step by Step Guide
Step 1.
First, sign into StoreFeeder using your login details. You will then be brought to the 'Dashboard' and will see a yellow bar  at the top of the page indicating that you have sales channels that have not been tested. To begin the integration, click on the link in the yellow bar .
If this yellow bar doesn't appear on your dashboard then look to the top right of the page for 'Settings'  then click 'Your Integrations'.

Step 2.
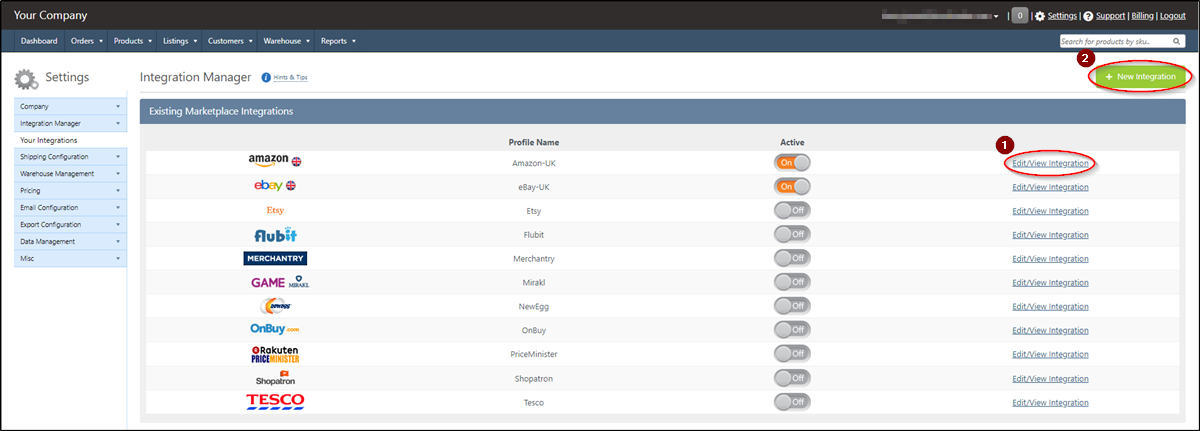
You will now see the 'Integration Manager' page and a list of all of your channels. To integrate your Amazon channel, click on 'Edit/View Integration' . If Amazon does not already appear on this list then you will need to set up a new integration for it; you can do this by clicking the green button marked '+ New Integration' . Both options have been circled in the picture below:
Step 3.
If you are editing an already existing integration, you can skip this step.
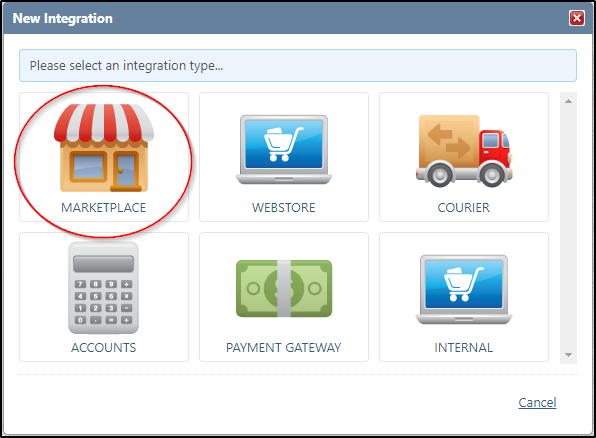
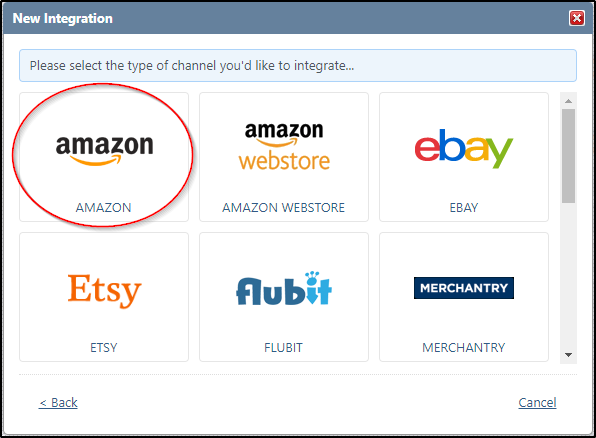
If you are creating a new integration you will then be greeted by the following screens where you will need to pick the circled options.
You will then be asked to input a name for the integration and select which Amazon Store you are selling through; you will also be asked if you wish to extend permissions to all users on your account. Once you have finished, click the '+Add Integration' to proceed.
Step 4.
To create the link between StoreFeeder and your Amazon account, click on the Connect To Amazon link and you will be redirected to your Amazon Seller Central account.
After logging in, you will need to select a Merchant and Marketplace. Select StoreFeeder and then the Amazon marketplace that you are wanting to integrate.
Once you have selected the merchant and marketplace, you’ll need to confirm authorisation for StoreFeeder to access the integration.
Once you have clicked confirm, you will be returned to the Amazon integration page in StoreFeeder.
Your Amazon account is now linked.
Finishing Up
At this point you can turn on the 'Automatic Listing Download' option.
Congratulations! Your Amazon account is now linked to StoreFeeder and your channel listings should start to download so that you can either map them to a product or create a new product from the listing.
Comments
0 comments
Please sign in to leave a comment.